Friday, April 19, 2013

The Clock

The Clock


Long, Long Time Ago, 100 years ago, when I was a kid I was fascinated with my Grandfather Pocket Clock or watch. He used to pull it out from his pocket with its long chain hanging out and hocked to his trousers, to check the time every Minute or 5 minutes. It seems to me it was part of him, because I want to play with it or even just touch it, he won't let me touch it.

So, After All Those Years! I Created my own iPhone pocket clock. 

But It's not just a clock, 


IT IS ### THE CLOCK ###


My iPhone Pocket Clock: 

- Shows me the time in 12 and 24 hours at the same time. 

- Has 5 hands, one for the seconds, minutes, hours, and another shows/point the time in 24 hours, and another one for the Alarm.

- Shows me the Length of the Day and Night.

- Shows me the intervals of the Day Times: Dawn, Sunrise, Noon, Afternoon, Sunset, and Night time.

- Also, Displays a Digital Clock, telling the Time and whether it is AM or PM, and shows me the Day of the Week, and the Todays Date.


- Shows me the current time as you move for any location in anywhere, in any country without me adjusting it, and I don't need to adjust the Daytime Saving any more, even for in any Country in the Whole World.

- And, and top of that, it has an Alarm, which my Grandfather clock doesn't!

BUT, ... 

With all its high Sophisticate features, It didn't lose its antic feels.

It act like my Grandfather clock, (like mechanical clock).

You can make It Ticks every second by Shaking it close to your ear, (like my Grandfather use to do, though, I don't know why he used to do that! Maybe to check to make sure it runs...). 

It has Two Kinds of Ticks. If you keep shaking it close to your ear it changes the tick, until you are happy with the tick. (Like my Grandfather used to do!)

It gives the feeling of sound of an Old Clock (sound like rubbing rusty metal parts against each other). 
That happen, when you move the Red Alarm Hand, 
and another kind of a sound,
The sound of one of the Clock when it is ticking, making it like the clock is dying on you, so you have to shake it more close to your ear several time, like i said, like my Grandfather used to do! :)

And another sound; It gives the sound of like when you winding the clock, and it happen when you adjust the Alarm Minute from the clock ear. (Swipe left or right on the Clock Ear to increase or decrease the alarm minute, if you had problem getting the Alarm setup exactly to your needs)

And, If you stay late at night, at 12am o'clock, you can watch the day changes with the Bells Sounds, and You Don't Want to miss the Fireworks Show.

Note:
Speaking of the Fireworks; If you like it you can activate it anytime you want, but before you can do that you have to Discover the Secret Numbers, by Discovering The Alarm Setting for Hour Number it is from 0 to 23, and the Minute Number from 1 to 59, by adjusting the Alarm Time by swiping left or right by you finger on the Clock Ear. If you hit the correct time numbers, You Won. A Message will popup showing the numbers you discovered, AND wait there is a surprise Gift for you.... 
I am not going to tell! 

Good luck and Enjoy it....

Thank you Apple, you are the Greatest.


Wednesday, February 27, 2013

Medical Thermometer


Medical Thermometer


OK, Let's play a Doctor... 
The Medical Thermometer App makes the iPhone act like a real medical thermometer, it measure the temperature of your body (Not Really, it's just only for Pure Entertainment). 
Just like when the Nurse measures your temperature in the doctor's clinic. 
The thermometer beeps when it is turn on, shakes it before sticking it in... (you really have to shake the iPhone before you start, and it'll give you the whoosh sound, that means you are ready to stick it in...), it ticks when measuring, and then it beeps again whenever it got your temperature, and then check your temperature degree. 

OK, Enough having fun... 
The Medical Thermometer App can be used as convertor between Fahrenheit °F and Celsius °C degrees (No, this one is for real). 
It is good to be used in Hospitals by the Technician Nurses, and/or in Clinics by the Nurses, because it shows both Fahrenheit °F and Celsius °C degrees. No need to look at hard copy chart to tell patient what is the degree in either Fahrenheit °F or Celsius °C degrees or vice versa. 

OK, What are you waiting for, go a head download it and have fun... 


WARNING: 
Medical Thermometer App IS JUST FOR ENTERTAINMENT. 
Medical Thermometer App ACTS LIKE a real Medical Thermometer, in sense of the behaviors, shakes, sound, ticks, and the NUMBERS ARE CHOSEN RANDOMLY UP OR DOWN.
THIS IS NOT A REAL MEDICAL THERMOMETER. IT DOES NOT REALLY, IN ANY WAY, MEASURES THE BODY TEMPERATURE, NEITHER THE iPhone DOES.


Big Thanks for all the people from clker.com who supply all the free beautiful arts, images, and clips.


Saturday, February 9, 2013

iThermometer

iThermometer


iThermometer App surpassed from the other similar Apps by its characteristic for easiness,  simplicity, convenience, comprehensive, inclusive, and informative features.

iThermometer App is Two in One App:
#1. A Temperature Degrees Converter between Fahrenheit (F) and Celsius (C) only.
#2. A Weather Forecast display for a current temperature and weather condition, in an intuitive way.

Interacting with all its features in all iPhone Orientation in the most handy, simple, and comprehensive way.

#1- Convert between Fahrenheit (°F) and Celsius (C) interchangeably in three different easy and convenient ways:
1. Move/Drag the slider up and/or down to get matching results.
2. Over Tap on either the Fahrenheit (°F) and/or Celsius (C) degree numbers, to open text field box, and enter your numbers to covert, for more pierces result.
3. Double Tap on either the Definition of Fahrenheit (°F) and/or Celsius (C), to display a Plus and a Minus buttons to change the degrees in either Fahrenheit (F) and/or Celsius (C), degree by degree for rounded number result.

#2- Inclusively, Separately and  Interactively  with the Degrees Convertor screen.
You can Receive and display the current weather temperature and conditions forecasting anytime anywhere you want in the world, for that moment, and you can change the display for either Fahrenheit (F) and/or Celsius (C) by keeping your choose selection of either the Definition of Fahrenheit (F) and/or Celsius (C) ON, or double tap on any of the degree weather condition.
Double tapping on the Weather Conditions screen removes it up and double on the shutter moves it down and over.

iThermometer FREE version features:
1- Displays the current temperature degrees in both Fahrenheit (°F) and Celsius (C), when you run and enter the App.
2- Convert between Fahrenheit (°F) and Celsius (C) interchangeably in first two ways, similar to the Full Version.
3- Support Portrait Orientation ONLY.

Thank you for the weather data fem worldweatheronline.com.


Tuesday, January 22, 2013

Arabic Lesson 1

Arabic Lesson 1 
(Arabic Alphabets)


The App is the first App of the Arabic language lessons.
The app can be used as a reference and education that you can refer to all the time, and sort of a learning tool in a game style.

Arabic Lesson 1 start and focus only on the Arabic Alphabets. 
The App covers all letters and their shapes that might occurs in any Arabic word, with all extra vocally characters and other different letters combination forms.
It teach you that in a simple way that you'll never miss reads or writes it. 
Also It teach you how to pronounce each Alphabets, and how to write it, and at the end you'll be able to write each Alphabet Name by hearing its voice sound.

The contents of the App is done by an individual effort, and with the help of my father guidance (GOD Bless his soul), especially lesson one, which the idea was taken from an Arabic Alphabets Playing Card Game that my father did. The rest of supported information was taken from the Internet.

If you find this App is useful, your comments and suggestion are most welcome, so as to upscale and improve it to the best. 


Thursday, August 2, 2012

ChooseiT (Free)


Be fair to everybody, be fair to everything.

ChooseiT app is the only app that let you to go through all the options fairly in turn by not choosing the same option again and again and skipping others.

ChooseiT saves the selected decision options, either manually or randomly, from the selected box, so as to go through the rest until all are selected. Then you can reset them back to choose from.

ChooseiT allow you to enter as many as decisions and related options.

- "Who's going to clean the dishes" decision: Kevin was selected the first day, he won't be selected again until everybody else are selected, either randomly or manually.

- "What to eat tonight" decision: Steak is chosen already, you won't eat it again until you through all the other options.

- "which wife to stay with tonight" decision (sorry this is only for Arabs): Don't favore one over the other, let ChooseiT do the job, fair and square. ... no more comments! :)

- "Which DVD movie Shall I watch" decision: Don't Worry, ChooseiT will go through them all without repetition until all watch.

- "Which Task shall I do First" decision.

and so on and on ...


ChooseiT App can be used for different kind of usages i.e.:

 - House Inventory.
 - Grocery List (can be used as standard list to pickup from manually).
 - Keep track of you favorite URL Website.

Don't let your imagination stop you from using it as you want.


Step 0: General Overview

1. The Decision Button: Tap on it to change your Decision and its related Options. A popup View will display to choose from (Number 23)

2. The Random Selection Button: Tap on it to select a random Option from the Box number 6.

3. The Manual Selection Button: Select any Option from Box number 6 and then Tap on the button to move it to Box Number 7.

4. The Manual Individual Option Reset Button: Select any Option from Box number 7 and then Tap on the button to move it back to Box number 6.

5. The Reset Options Button: Tap on to reset/move all Options to box number 6.

6. The Box/List for all Available Options to select from.

7. The Box/List for all already Selected Options.

9. The Update Decisions Tab: This is where you go to Add, Update, and delete Decisions an its related Options.

8. The Choose iT Tab: This is what the above View is, where you let ChooseiT make a decision and/or  you do it yourself and save it.


Step 1: Decision View

13. The first time you run your App and/or when you clear all you Decisions, The Decision View will be the only active view you'lbe able to interact with.

15. Enter A Decision Category.

11. Tap on the + Sign Button to add a new Decision.
         (See Step 10)

14. Tap on the Edit Button to Delete a Decision or you can Add a new Decision. (See Step 10)


.

Step 2: Navigating to The Decision Options

17. Tap on the Left Arrow Button to Update Related Decision Options.
(see Step 3)


Step 3: Option View

19. The Options View: This is where you enter all related Options for the Selected Decision from the previous Step 2.

20. Display the Title of the Selected Decision.

21. Enter you Option.

18. Tab on it to go back to the Decision View. (see Step 1)


Step 4: Choose iT View

10. Display the Selected Option, either Randomly or Manually.

- Button Numbered 4 and 5 will be active when at least one Option is available in Box number 7

- Relate to the General Overview Step for more.


Step 5: Changing A Decision


1. When you tab on Decision Button, a view with all available Decisions will popup to choose a new Decision.

23. Is all the List of Decisions you enter in the ChooseiT App.
Scroll Up and/or Down to select a Decision.

24. When you Select a Decision, Tap over the Set Decision Button to Change your Decision and its related Options.

25. Is the Cancel Button: if you decide to keep you current Decision as is.

- When you Tap on either 24 or 25 Buttons you be back on Choose iT View (see Step 4)


Step 6: Adding new Decision


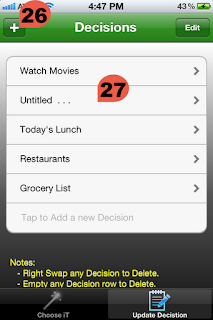
26. The + Sign Button: Tap on it if you want to add a new Decision Category from the Decision view.

27. A New Row will be added to the Decision List with [Untitled ...] title. Tap over it an change it to whatever you like.

- Also you can Add a new Decision by Tapping and Type whatever you on the Last Row in the List.


Step 7: Deleting a Decision


30. When you Tap on the Edit Button (Number 14) (see Step 1), it will change to Done.

32. A Red Circle minus sign Buttons will be display pre to each Decision Row.

28. Tap on Red Circle minus sign Buttons on any row, you'll see it will rotate an a Red Delete Button will show.

29. Tap on The Red Delete Button to delete the Selected Decision.

- Another way to delete a Row is to Swap your finger from the right side to the left side of any row, the Red Delete Button will show.

- By Swapping any row, the Edit Button (Number 14) will change to Done (Number 30).


30. Tap on the Done Button when you are done.

32. All those Buttons will disappear.


Final Step: ChooseiT Usage:


- One of my Favorite usage of ChooseiT is I can use it as a Grocery List. I select all I remember during the few days before I o my grocery, and when I am in the super Market I remove them one by one as I am shopping.

- To me it is different than any other Apps  where you have keep entering them again and again and delete the list.

- This way you enter them once an select what you want, and then take it out when you have it in your shopping cart, and focus on the left list until they are all done.


o- I use it for all the Websites and Blogs that I have. They are many and some I don't use, but late I remember that I need it, so I look it up.